In this mini-project, a smart home solution from scratch constructed. AI-powered gesture recognition (Android) app can open or close a (remote) door. This mini-project involves technologies such as AI, Data Science, IoT, Android, Cloud computing etc.
Abstract
Smart home solutions involve AI and IoT technologies to control doors in order to ensure safety and security of the home. AI is used to train images of human gestures such as palm and fist. An Android application recognizes the gestures by using this trained model. This app sends gesture info as MQTT message through MQTT server. An IoT app subscribes to these messages and receives. This IoT app controls a servo motor to open or close the door based on the received MQTT message. This project involves technologies such as AI, Data Science, IoT, Android, Cloud computing etc.
The following development environments are required:
- Web application to train human gestures (HTML)
- Google Colab to convert web model to TFLite model (Python)
- Android Studio to develop Gesture application (Java)
- Arduino to develop IOT app running on Node MCU (Arduino Sketch)
- Google Cloud VM for MQTT server (Java Script)

Data Preparation and training
Step 1: Prepare index.html file:
Download index.html file from Github
Add code for open as follows
<div class=”control-button-wrapper”>
<div class=”control-inner-wrapper” id=”open-button”>
<div class=”control-button” id=”open”>
<div class=”control-icon center” id=”open-icon”><div><img src=”assets/open.svg”/></div>OPEN</div>
<div class=”add-icon invisible” id=”open-add-icon”>
<img class=”center” src=”assets/icon.svg”/>
</div>
<canvas width=”224″ height=”224″ class=”thumb hide” id=”open-thumb”></canvas>
</div>
</div>
<div class=”sample-count” id=”open-total”><img src=”assets/invalid-name.svg”/></div>
</div>
Similarly add code for close and none
Step 2: Prepare ui.js file
Download ui.js file from Github
Add or update code for the labels – open, close and none
Add or update the following code
const CONTROLS = [
‘up’, ‘down’, ‘left’, ‘right’, ‘leftclick’, ‘rightclick’, ‘scrollup’,
‘scrolldown’, ‘open’, ‘close’, ‘none’
];
const totals = [0, 0, 0, 0, 0, 0, 0, 0, 0, 0, 0];
const openButton = document.getElementById(‘open’);
const closeButton = document.getElementById(‘close’);
const noneButton = document.getElementById(‘none’);
openButton.addEventListener(‘mousedown’, () => ui.handler(8));
openButton.addEventListener(‘mouseup’, () => mouseDown = false);
closeButton.addEventListener(‘mousedown’, () => ui.handler(9));
closeButton.addEventListener(‘mouseup’, () => mouseDown = false);
noneButton.addEventListener(‘mousedown’, () => ui.handler(10));
noneButton.addEventListener(‘mouseup’, () => mouseDown = false);
Step3: Capture images
Open index.html in your Chrome browser.
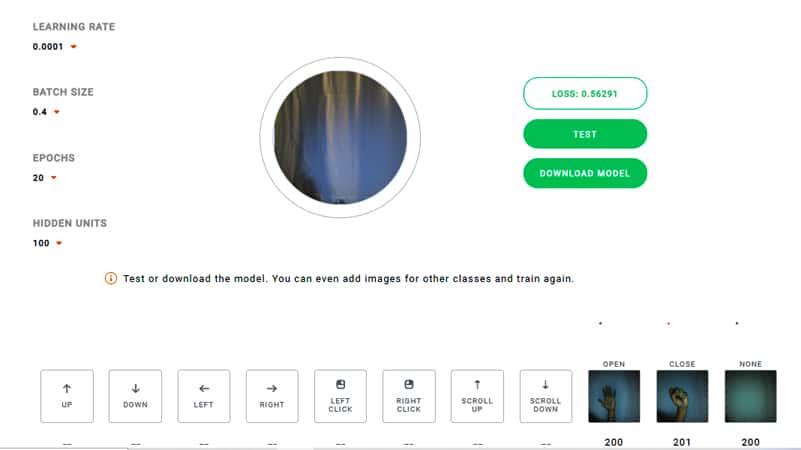
Set the parameters:
Learning rate = 0.0001, Batch size = 0.4, Epochs = 20 and Hidden Units = 100
Capture images for open, close and none by clicking their icons
(200 images for each with different lighting conditions)
Step4: Train the images
Click Train button
Wait for training to complete
Click Test button
Test open, close and none operations
Download the model by clicking ‘DOWNLOAD MODEL’ button
The following files are downloaded
labels.txt, model.json, model.weights.bin

Convert tensorflowjs model to tflite model
Step1: Upload Notebook
Upload notebook – tensorflowjs_to_tflite_colab_notebook.ipynb from Github Link
Step2: Setup the Environment
In colab, install the following
tensorflow>=1.13.1
tensorflowjs==0.8.6
keras==2.2.4
Upload the following files to Colab:
model.json, model.weights.bin
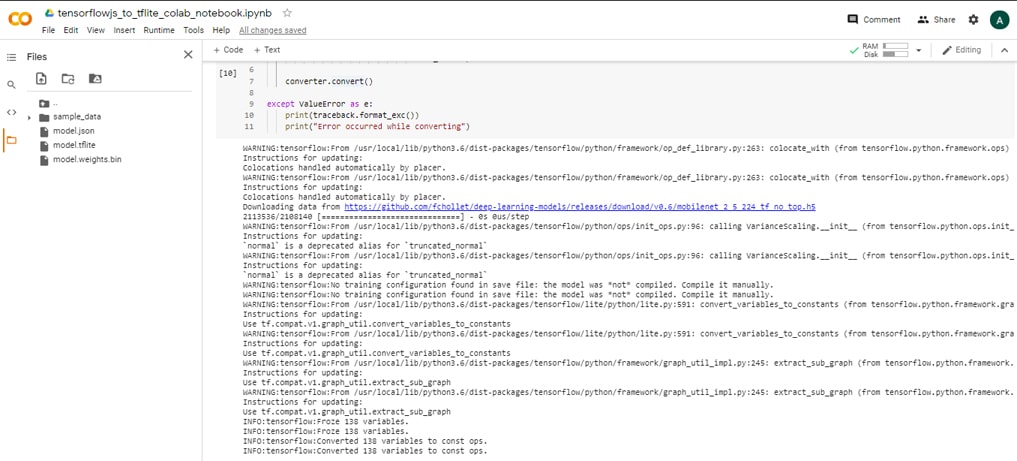
Step3: Execute Notebook
Execute the cells in the notebook
This will generate converted model file -> model.tflite
Note: Transfer learning from MobileNet is used to create the final model
The web model is top model
The MobileNet is the base model
Top model is merged with the base model to create a merged keras model
Then merged keras model is converted to TFLite model, which can be used in mobile
Step4: Download the model file
Download model.tflite file from Colab

Create Android application for Gesture recognition
Step1: Change code or download code from Github
I. Changes in the code (ImageClassifier.java)
from
labelProbArray = new float[1][8];
to
labelProbArray = new float[1][3];
II. XML layout changes:
Change up -> open, down -> close, left -> none
and
comment out other layout elements such as right, left_click, right_click, scroll_up, scroll_down in
res->layout->layout_bottom_sheet.xml
res->layout->layout_direction.xml
III. changes in Camera2BasicFragment.java
Change up -> open, down -> close, left -> none
and comment out other layout elements such as right, left_click, right_click, scroll_up, scroll_down
IV. Comment out code related to
// rightLayout,
// leftClickLayout,
// rightClickLayout,
// scrollUpLayout,
// scrollDownLayout;
V. Check probability to change the state:
String probabilityStr = textToShow.toString().substring(textToShow.toString().indexOf(“:”)+1,
textToShow.toString().indexOf(“:”)+7);
double probability=0.0;
try {
probability = Double.parseDouble(probabilityStr.trim());
} catch (NumberFormatException e) {
Log.e(“amlan”, “numberStr is not a number”);
}
String finalToken = token;
if(probability<0.8){
finalToken = “NONE”;
}
Step2: Integrate MQTT code
a. Update Build.gradle
implementation ‘org.eclipse.paho:org.eclipse.paho.client.mqttv3:1.2.4’
implementation ‘org.eclipse.paho:org.eclipse.paho.android.service:1.1.1’
b. Update the code for Camera2BasicFragment.java or download from Github
c. Update Manifest
<uses-permission android:name=”android.permission.WAKE_LOCK” />
<uses-permission android:name=”android.permission.INTERNET” />
<uses-permission android:name=”android.permission.ACCESS_NETWORK_STATE” />
<uses-permission android:name=”android.permission.READ_PHONE_STATE” />
<uses-permission android:name=”android.permission.RECORD_AUDIO” />
<service android:name=”org.eclipse.paho.android.service.MqttService” />
d. publish the gesture state
if(validMQTT==true) {
publish(client, finalToken);
}
Step3: Check with Mosquitto
Run the Android app
Open a command window
Subscribe to the topic – ‘gesture’
mosquitto_sub -h digitran-mqtt.tk -t gesture -p 1883

Create Arduino application to open/close door
Step1: Connect Servo motor to NodeMCU Blynk board Connection:
Orange wire connects to Digital pin D4.
Brown wire connects to GND pin
Red wire connects to 3V3 pin
Step2: Create Arduino application (gesture.ino) file or download from GitHub: Link
Step3: Add code for opening and closing the door.
Subscribe to topic – ‘gesture’
To open the door, turn servo motor to 90degree.
To close the door, turn servo motor to 0degree.
client.subscribe(“gesture”);
if ( msgString == “open” )
{
servo.write(90);
Serial.print(“gesture: “);
Serial.println(“open”);
}
else if ( msgString == “close”)
{
servo.write(0);
Serial.print(“gesture: “);
Serial.println(“close”);
}

MQTT server setup
MQTT server: digitran-mqtt.tk
MQTT port: 1883
Refer the following link for the steps to setup MQTT server in GCP VM:
Demo
The demo of this project is given in this Link
References
- TensorFlow Lite Gesture Classification Android Example Link
- Motion Gestures Detection using Convolutional Neural Networks and Tensorflow on Android Link
- Motion Gesture Detection Using Tensorflow on Android Link
- Training a Neural Network to Detect Gestures with OpenCV in Python Link
- Interfacing Servo Motor With NodeMCUs Link
- Make Automatic Door Opening and Closing System using IR sensor & Servo Motor | Project for Beginners Link


